A well-designed seed-starting station can transform your community garden's growing season, giving members a head start on planting while making the most of shared resources. Whether your group is brand new to seed starting or looking to upgrade from a collection of mismatched trays on a windowsill, building a communal station with automated temperature controls is one of the most rewarding infrastructure projects a community garden can undertake.
This guide walks you through everything you need to know — from planning and materials to automation setup and ongoing maintenance — so your garden community can grow stronger seedlings together.
Getting Started
Before you pick up a single screw or purchase a thermostat, take a moment to gather your community garden members and talk through the vision. A communal seed-starting station works best when it reflects the actual needs of the people who will use it. Ask questions like: How many members want to start seeds each season? What crops are most important to your community? Is there a dedicated indoor or sheltered space available, or will the station live in a greenhouse or covered structure?
Once you have a clear picture of your community's needs, you can begin planning a station that is appropriately sized, practical, and enjoyable to use. Starting with good communication sets the tone for a project that everyone feels ownership over — which matters a great deal when the goal is shared stewardship.
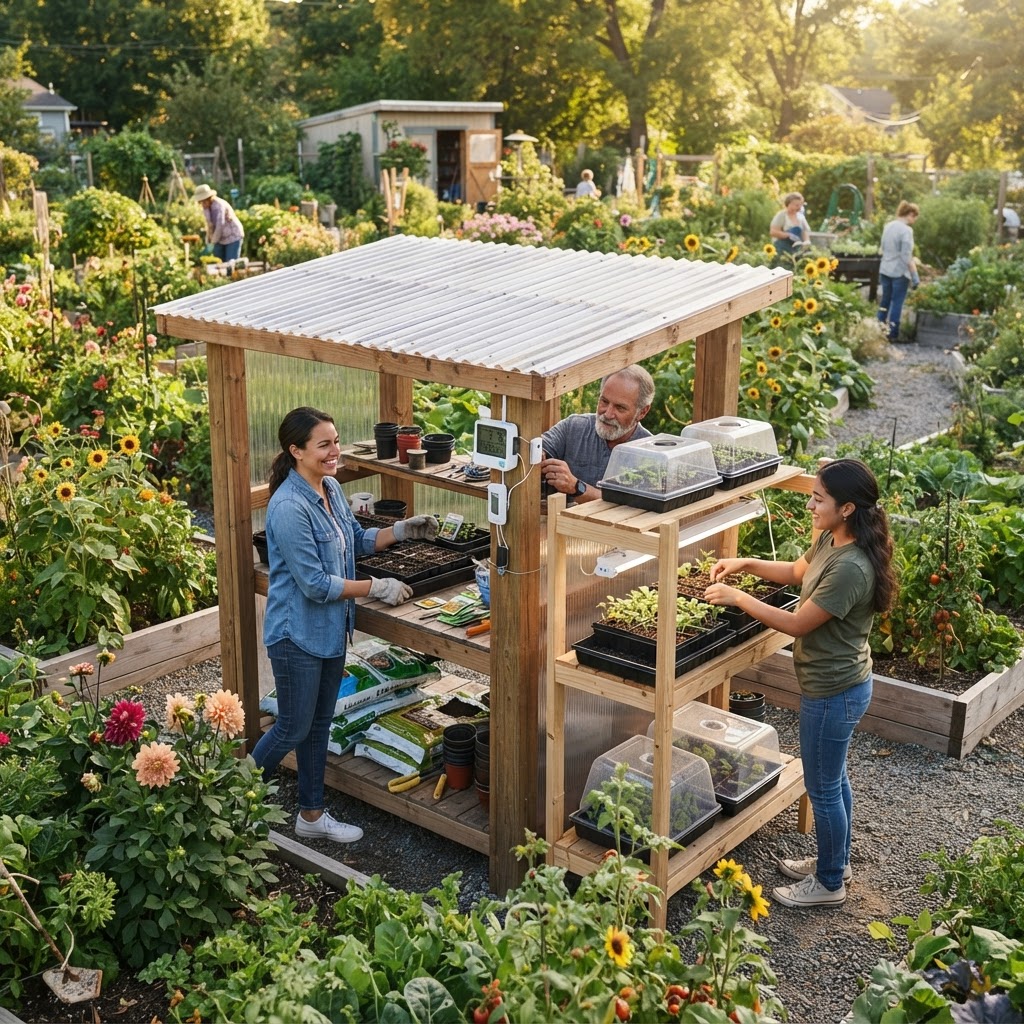
The typical communal seed-starting station consists of sturdy shelving, grow lights, heat mats connected to a thermostat controller, and good airflow. The "automated" part comes from using plug-in thermostat controllers that regulate soil temperature without requiring someone to manually check and adjust settings throughout the day. This makes the station much more reliable and beginner-friendly.
Planning Your Communal Seed-Starting Station
Assess Your Space
The location of your station will shape every other decision you make. Ideal locations include:
- An insulated shed or indoor community room
- An existing greenhouse or hoop house
- A covered, weather-protected outdoor area with access to electricity
You need reliable access to electrical outlets — ideally a dedicated circuit if you plan to run multiple heat mats and grow lights simultaneously. Before building anything, consult with someone knowledgeable about electrical load to make sure your setup won't trip breakers or create safety hazards.
Measure your available floor space and ceiling height. A standard set of wire shelving units works beautifully for seed starting and allows you to stack multiple growing levels vertically, maximizing the footprint.
Determine Capacity
Think about how many seed trays your community realistically needs at peak starting time. A standard 1020 tray (ten inches by twenty inches) is the most common format for seed starting. Most wire shelving units accommodate two to three of these trays side by side per shelf. A four-shelf unit gives you eight to twelve trays per unit — enough for a small to medium community.
For larger gardens, plan for two or more units arranged side by side or back to back.
Budget Planning
Gather quotes for materials before committing to a design. Key cost areas include:
- Shelving units
- Heat mats and thermostat controllers
- Grow lights (LED panels are the most cost-effective long-term option)
- Electrical supplies and extension cords rated for the load
- Seed trays, cell inserts, and growing medium (often a shared expense)
Community gardens can often offset costs through member contributions, local grants, or partnerships with garden supply stores. Keep the budget transparent and involve members in decisions about where to invest.
Materials and Tools You Will Need
Materials
- Heavy-duty wire shelving units with adjustable shelves (chrome or coated steel)
- Seedling heat mats sized to fit your trays
- Plug-in thermostat controllers (one per heat mat, or multi-outlet controllers for larger setups)
- Temperature probe sensors (usually included with thermostat controllers)
- Full-spectrum LED grow light panels or T5 fluorescent shop lights
- Light timer outlets (mechanical or digital)
- Power strips rated for the electrical load
- Zip ties or S-hooks for mounting lights
- Chains or adjustable hanging hardware for lights
- Waterproof labels and a sign-up sheet system for member organization
Tools
- Drill and bits (if mounting to walls or building a custom frame)
- Level
- Measuring tape
- Zip tie cutters
- Voltage tester (if working near existing wiring)
Building the Station Frame and Shelving
Assemble your wire shelving units according to the manufacturer's instructions, placing them on a flat, stable surface. Position the shelves so there is enough vertical clearance between each level to accommodate both the seed trays and the grow lights above them.
A good starting guideline is to leave at least twelve to sixteen inches of vertical space per growing level. This gives seedlings room to grow and allows lights to hang at an appropriate distance — typically two to four inches above the tops of seedlings for T5 lights, and four to eight inches for LED panels (always check manufacturer recommendations, as LED output varies by model).
If you are building a freestanding structure from scratch using lumber, use pressure-treated or rot-resistant wood for the base and standard construction lumber for the uprights and shelves. Coat wooden shelves with a waterproof sealant to handle the inevitable moisture from watering.
Secure shelving units to a wall if there is any risk of tipping, especially in a space where children or many people will be moving around. Safety first.
Installing Automated Temperature Controls
This is the heart of what makes a communal station so effective and low-maintenance. Automated temperature controls take the guesswork out of soil warmth — one of the most critical factors in successful germination.
How Heat Mats and Thermostat Controllers Work
Seedling heat mats warm the soil from below, encouraging faster and more even germination. However, running a heat mat without a thermostat can overheat the soil, which stresses or kills germinating seeds. A thermostat controller plugs into the wall outlet, the heat mat plugs into the controller, and a small temperature probe sits in the soil of one of your trays. The controller reads the probe and switches the mat on or off to maintain your target temperature.
Most vegetable seeds germinate best at soil temperatures between 70°F and 85°F (21°C to 29°C), with warm-season crops like tomatoes, peppers, and eggplant preferring the higher end of that range.
Setting Up the Thermostat
- Plug the thermostat controller into your power strip or outlet.
- Plug the heat mat into the thermostat controller's outlet.
- Insert the temperature probe into the growing medium of a centrally located seed tray, about an inch deep.
- Set the target temperature on the controller display. Start at 75°F (24°C) as a general baseline.
- Monitor actual soil temperatures for the first day or two and adjust as needed.
For a communal station, consider labeling each thermostat clearly with the target temperature and the crop types it is serving. This prevents well-meaning members from accidentally adjusting settings.
Organizing Controls for Multiple Users
Use clearly labeled zones on your station — for example, "Warm Zone: Tomatoes/Peppers (80°F)" and "Cool Zone: Lettuce/Herbs (68°F)." Post a simple reference chart near the station listing recommended germination temperatures for common crops.
Lighting Considerations
Adequate light is just as important as soil warmth. Without sufficient light, seedlings become leggy and weak, even if germination goes smoothly.
LED grow panels designed for seedlings offer the best combination of energy efficiency, low heat output, and full-spectrum light. Mount them on adjustable chains so their height can be changed as seedlings grow. Connect all lights to a timer set for fourteen to sixteen hours of light per day — this mimics long spring days and encourages compact, vigorous growth.
Label the timers so members understand the schedule and do not unplug or reset them without coordinating with other users.
Organizing the Station for Community Use
A communal station only works well when it is organized fairly and clearly.
- Create a sign-up system: Use a physical sign-up sheet or a shared online document where members can reserve shelf space and heat mat zones for specific weeks.
- Label everything: Each member's trays should be clearly labeled with their name, crop, variety, and date seeded.
- Post clear instructions: Laminate a simple one-page guide covering how to use the thermostat, when to water, and how to clean up after use.
- Schedule a weekly check-in: Even a five-minute group check during a regular garden meeting keeps everyone informed and allows for quick troubleshooting.
- Establish a rotation: During peak season, shelf space may be in high demand. Agree in advance on how long members can hold space before seedlings must be moved to hardening-off areas.
Common Mistakes to Avoid
Overcrowding the station. It is tempting to fit in as many trays as possible, but crowded seedlings compete for light and airflow, which leads to weak, disease-prone plants. Leave space between trays for air to circulate.
Ignoring electrical safety. Running too many devices from a single outlet or using extension cords not rated for the load is a fire hazard. Always calculate total wattage before plugging everything in, and use heavy-duty, grounded power strips.
Setting the thermostat and never checking it. Probes can shift out of position, trays can move, and equipment can malfunction. Check actual soil temperatures with a simple soil thermometer periodically, not just the thermostat display.
Skipping the hardening-off step. Seedlings raised in a controlled, warm, sheltered station need a gradual transition to outdoor conditions. Skipping this step — moving seedlings directly from the station into the garden — leads to transplant shock. Plan a dedicated hardening-off area near the station.
Poor labeling and communication. In a communal space, unlabeled trays lead to confusion and mistakes. Make labeling a non-negotiable part of using the station.
Using the wrong growing medium. Standard garden soil is too dense for seed starting and can harbor pathogens. Always use a quality seed-starting mix or soilless medium.
Tips for Success
- Start with a pilot season. In your first year, run the station at partial capacity. This gives your community time to work out scheduling and maintenance before scaling up.
- Designate a station steward. Assign a rotating role of "station steward" responsible for weekly checks, light adjustments, and basic troubleshooting. Rotate this role seasonally so knowledge spreads through the group.
- Keep a shared logbook. Record what was started, when, and how it performed. Over time, this becomes an invaluable resource for your specific climate and conditions.
- Calibrate your thermostats. Use a separate soil thermometer to verify that your thermostat controllers are reading accurately. Inexpensive controllers can have some variance.
- Use a humidity dome wisely. Humidity domes accelerate germination by keeping moisture in, but remove them promptly once seedlings emerge to prevent damping-off disease.
- Clean between crops. Between planting rounds, wipe down heat mats, trays, and shelves with a diluted hydrogen peroxide solution to prevent the spread of soilborne diseases.
- Invest in good grow lights. Cheap lights often lack the spectrum or intensity seedlings need. A quality LED panel pays for itself in stronger transplants and reduced replacement costs.
Conclusion
Building a communal seed-starting station with automated temperature controls is one of the most impactful investments a community garden can make. It extends your growing season, reduces individual costs, and brings members together around a shared resource that produces real, tangible results every spring.
The key to making it work is thoughtful planning, clear communication, and consistent maintenance. When your community can count on a warm, well-lit, well-organized space to get seeds off to a strong start, the benefits ripple through the entire garden season — in stronger transplants, earlier harvests, and a deeper sense of shared purpose.
Start small, iterate, and let the station grow along with your community's experience and ambition. The seeds you start here are more than just plants — they are the beginning of each season's collective story.